![]()
Acquisition Controls
![]() Run/Stop Button
Run/Stop Button
Push the RUN/STOP button to stop and start waveform acquisition. Also push RUN/STOP when you want to resume continuous acquisition after a single-sequence acquisition. Readout in the top left corner of the display shows the status of the acquisition.
| Acquisition status readout | Description |
| Run: | Acquisition is running. |
| Roll: | A roll-mode acquisition is running. |
| Stop: | Acquisition is stopped. |
| PreVu: | Previewing; waiting for trigger. |
While acquisition is running or stopped, you can use these controls to examine the waveforms:
- Channel buttons to select a channel
- Zoom button ![]() with
horizontal POSITION and SCALE to magnify waveforms (does not affect
the actual time base or trigger position settings)
with
horizontal POSITION and SCALE to magnify waveforms (does not affect
the actual time base or trigger position settings)
- WAVEFORM INTENSITY to adjust gray-scale level
- CURSOR button to activate cursors to measure waveforms
- MEASURE button to select automatic measurements of waveforms
- Hard copy button ![]() to print
a hard copy
to print
a hard copy
While acquisition is stopped, you can change the vertical and horizontal controls to use in the next acquisition. See LINK for more information about this function.
![]() Single Sequence
Button
Single Sequence
Button
Push the SINGLE SEQ button to execute a single-shot acquisition. The function of the SINGLE SEQ button depends on the acquisition mode.
| Acquisition mode | SINGLE SEQ function |
| Sample or Peak Detect | One acquisition of each displayed channel is acquired, concurrently |
| Envelope N or Average N | N acquisitions of each displayed channel are acquired (N is user adjustable with the general purpose knob) |
When you push the SINGLE SEQ button, the oscilloscope does the following things:
- The trigger mode is set to Normal
- The trigger system arms and the light next to the SINGLE SEQ button turns on
After the single-sequence acquisition is complete, acquisition stops and the light next to the SINGLE SEQ button turns off.
Push the SINGLE SEQ button again to acquire a new sequence, or push the RUN/STOP button to restart continuous acquisition.
 Autoset Button
Push the AUTOSET button to automatically adjust the vertical, horizontal, and trigger controls for a usable display. You can manually adjust any of these controls if you need to optimize the display.
When you are using more than one channel, the auto set function sets the vertical scale for each channel and positions the channels to prevent overlapping. The autoset function selects the lowest-numbered channel in use and then uses that channel to set the horizontal and trigger controls.
The autoset function also changes the following oscilloscope
settings:
- Acquisition mode is set to Sample
- Bandwidth limits are set to Full
- Zoom is turned off
- Trigger is set to Auto mode and minimum holdoff
- Trigger is set to Edge type, DC coupling, and rising slope
- B trigger is turned off
- XY display format is turned off
- Channel 1 is turned on and selected if no active channels are
in use
If you push the AUTOSET button by accident, you can undo it
with these steps:
- Push the ACQUIRE button.
- Push the Autoset screen button and then push the Undo Autoset
screen button.
 Waveform Intensity
The WAVEFORM INTENSITY adjusts the intensity of the waveforms in the display.
Use a medium intensity setting to get an analog-oscilloscope view of time-varying signals and those containing modulation. Use the maximum intensity setting to view the signals the way most digital oscilloscopes display them.
You can turn on display persistence to slow or prevent the decay of the waveform points. With persistence on, you can simulate the function of an analog storage oscilloscope. See LINK for more information about display persistence.
 Acquire Menu
Push the Acquire MENU button to show the acquire menu.
| Bottom | Side | Description |
| Mode | Sample | Use for normal acquisition. |
| Peak Detect | Detects glitches and reduces the possibility of aliasing. | |
| Envelope N | Captures variations of a signal over a period of time. (Adjust N with the general purpose knob.) | |
| Average N | Reduces random or uncorrelated noise in the signal display. (Adjust N with the general purpose knob.) | |
| Resolution | Fast Trigger (500 points) | Acquires 500 point waveforms at a fast repetition rate. |
| Normal(10k points) | Acquires 10,000 point waveforms with more horizontal detail. | |
| Reset Horizontal Delay | Set to 0’s | Resets the horizontal delay time to zero. |
| Autoset | Normal Autoset | Executes the autoset function.(Optional application modules may add choices to execute specialized autoset functions.) |
| Undo Autoset | Reverts to the settings before the last autoset. |
![]()
Key Points
Vertical and Horizontal Preview. The vertical and horizontal
preview functions let you change the vertical and horizontal controls
while acquisition is stopped or while it is waiting for the next
trigger. The oscilloscope rescales and repositions the current
acquisition in response to the new control settings, and then
uses the new settings for the next acquisition.
Preview helps you optimize these control settings before the next acquisition; this makes it easier to work with signals that are single-shot or have a low repetition rate.
- For more information about vertical preview, see LINK
- For more information about horizontal preview, see LINK
While acquisition is stopped you can make changes to other controls, but those changes will only take affect with the next acquisition. There is no preview for control changes other than the vertical and horizontal controls.
The preview functions also do not affect automatic measurements, cursor measurements, or the Math waveform. This data for these functions is always based on the current acquisition. If you rescale or reposition a channel waveform horizontally, it may not appear time-correlated to the automatic measurements, cursor measurements, or the Math waveform.
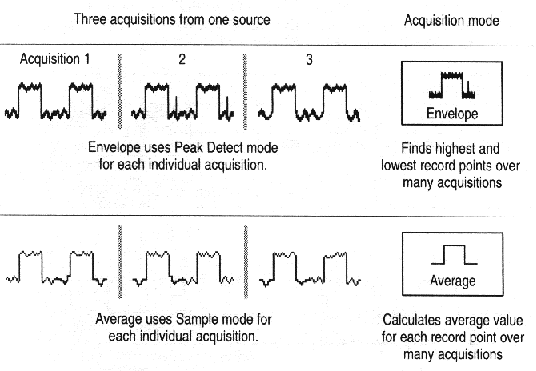
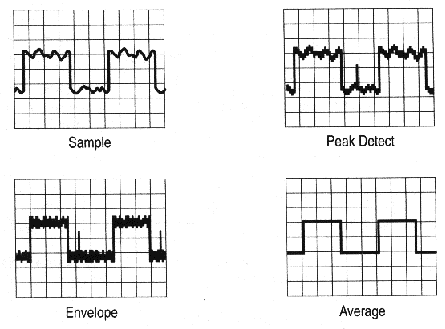
Acquisition Modes. You can choose one of four acquisition modes: Sample, Peak Detect, Envelope, or Average. The following describes these acquisition modes in detail.
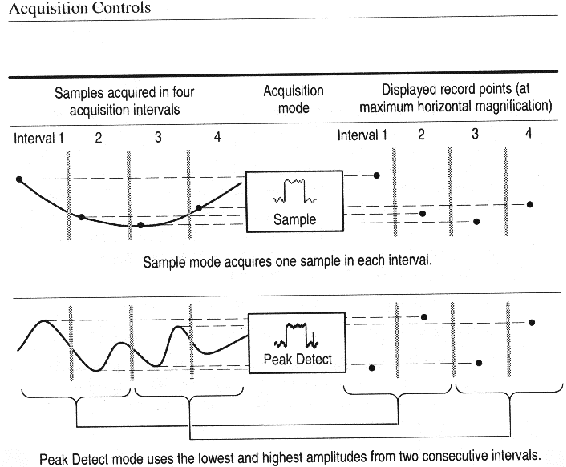
Sample. Use Sample acquisition mode for the fastest acquisition at any SEC/DIV setting. Sample mode is the default mode.
Peak Detect. Use Peak Detect acquisition mode to limit the possibility of aliasing. Also, use Peak Detect for glitch detection. You can see glitches as narrow as 1ns.
Peak Detect is only functional for sample rates up to 125 MS/s. For 250 MS/s and faster sample rates, the oscilloscope reverts to Sample acquisition mode, where the narrowest detectable pulse width is 1/(sample rate).
Envelope and Average. Use Envelope acquisition mode to capture variations of a signal over a longer period of time. Use Average acquisition mode to reduce random or uncorrelated noise in the signal you want to display.
The general purpose knob sets a specific number of acquisitions
(N) to include in the enveloped or averaged waveform.
- The enveloped waveform clears and then starts over after N acquisitions.
- The averaged waveform is a running average over N acquisitions.
- If you push the SINGLE SEQ button, an envelope or average acquisition
stops after N acquisitions.
If you probe a noisy square wave signal that contains intermittent, narrow glitches, the waveform displayed will vary depending on the acquisition mode you choose.
Acquisition Resolution. You can choose either Normal or Fast Trigger acquisition resolution. This setting determines the record length that is acquired and affects the other factors shown in the table below.
| Factor | Normal | Fast trigger |
| Record length | 10,000 points | 500 points |
| Maximum acquisition rate (approximate) | 500 waveforms/s | 5,000 waveforms/s |
| Maximum horizontal zoom factor | 200X | 10x |
Choose Normal or Fast Trigger acquisition resolution based on the characteristics of the signal you want to acquire.
| Signal characteristic | Better choice |
| Large amount of horizontal detail | Normal |
| Shape is stable or changes relatively slowly | Normal |
| Single shot | Normal |
| High trigger repetition rate | Fast Trigger |
| Shape changes rapidly | Fast Trigger |
| Contains modulation | Fast Trigger |
 Cursor
Push the CURSOR button to show the cursor menu.
| Bottom | Side | Description |
| Function | Off | Turns cursors off. |
| H Bars | Use to take vertical measurements. | |
| V Bars | Use to take both vertical and horizontal measurements. | |
| Bring Selected Cursor to Center Screen | Moves the active cursor to center screen. | |
| Bring Both Cursors On Screen | Moves any off -screen cursor onto the screen. | |
| Time Units | Seconds | Sets horizontal units to seconds. |
| 1 /seconds (Hz) | Sets horizontal units to Hz. |
Key Points
Cursor Movement. Use the general purpose knob to move the
active cursor. Push the SELECT button to change which cursor is
active. The active cursor is the solid line.
Faster Cursor Movement. Push COARSE to make larger cursor movements more quickly.
Finding Cursors. When using zoom, delay, or the fastest time base settings, the cursors can go off screen. If you want to find them, use the Bring Both Cursors On Screen function to move them onto the screen.
Fine Cursor Movement. When you magnify the waveform with the zoom function, you can easily set the cursor to any point on the waveform.
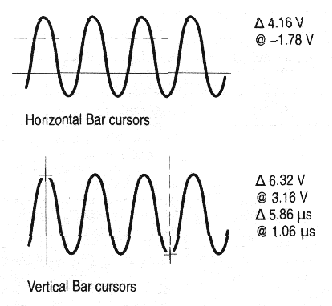
D Readout. The D readouts indicate the difference between the cursor positions.
@ Readout. For H Bar or V Bar cursors, the voltage readout after the @ symbol indicates the location of the active cursor relative to zero volts. For V Bar cursors, the time readout after the @ symbol indicates the location of the active cursor relative to the trigger point.
Cursor Interaction with Preview. If you change a vertical or horizontal control setting while acquisition is stopped or it is waiting for trigger, the cursors move with the waveforms and cursor measurements remain valid.
Taking Gray-Scale Measurements. Using cursors is often the best way to take simple measurements on waveforms that contain significant gray-scale information. The automatic measurements operate only on the latest acquisition, not on the previous acquisitions that are displayed in gray scale. However, you can set the cursors to surround and measure the gray-scale area of the waveform.
 Display
Push the DISPLAY button to show the display menu.
| Bottom | Side | Description | ||
| Waveform Display | Dots Only | Set to on to see dots only. Set to off to see dots and vectors. | ||
| Persist Time | Sets persist time. | |||
| Set to Min | Sets the persistence time to its minimum value. | |||
| Clear Persistence | Clears any displayed persistence. | |||
| Backlight Intensity | High | Use for bright ambient conditions.. | ||
| Medium | Use for dim ambient conditions. | |||
| Low | Use to extend battery-operation time. | |||
| Graticule | Full | Selects the graticule type. | ||
| Grid | ||||
| Cross Hair | ||||
| Frame | ||||
| XY Display | Off (YT) | Turns off an XY display. | ||
| On (XY) | Turns on an XY display. | |||
| CH1 (X) Versus | Displays CH2, CH3, or CH4, as Y versus CH1 as X. | |||
| Ref1 (X) Versus | Displays Ref2, Ref3, or Ref4 as Y versus Ref1 as X. | |||
| Color Palette | Normal | Selects the color display. | ||
| Monochrome | Sets all waveforms to high-contrast black and white. | |||
![]()
Key Points
Waveform Dots and Vectors. With Dots Only set to off, the
vectors between samples can be filled; increase the WAVEFORM INTENSITY
control to increase the amount of vector fill between samples.
The vector fill is most visible on fast signal edges or when horizontal
zoom is turned on.
Turn Dots Only on if you want to see just the actual samples.
Waveform Persistence. Turn on waveform persistence to slow the decay of waveform points. You can set the persistence to a specific time or to infinite. Infinite persistence keeps all waveform points in the display until you change a control setting that erases the display.
Display Colors. The channel buttons, waveforms, icons, and readouts are color-coded to help you identify them easily. The colors are preset and cannot be adjusted. However, you can select the Monochrome Color Palette if you prefer to see all the waveforms in high-contrast black and white.
XY Waveform Triggering. The XY waveform is triggered so you can synchronize periodic input signals to the XY waveform. This feature is useful when only one part of the period contains valid information that you want to see in the XY format. Set the time base and trigger location to acquire just that part of the period.
When you want to see the complete period of the signals regardless of the time base setting, set the trigger source to an unused channel and the trigger mode to Auto.
XY Waveform Scale and Position. If you want to display channel 1 in the horizontal axis versus channel 2 in the vertical axis, for example, use these controls to scale and position the XY waveform:
- Push the CH1 button and use the vertical SCALE and POSITION
controls to set the horizontal scale and position of the XY waveform.
- Push the CH2 button and use the vertical SCALE and POSITION
controls to set the vertical scale and position of the XY waveform.
You can control the position and scale of a Ref1 versus Ref2 XY waveform in a similar manner:
- Push the REF button, push the Ref1 screen button, and then
use the vertical SCALE and POSITION controls to set the horizontal
scale and position of the XY waveform.
- Push the REF button, push the Ref 2 screen button, and then
use the vertical SCALE and POSITION controls to set the vertical
scale and position of the XY waveform.
XY Waveform Restrictions. The following functions do
not work in the XY display format:
- Math waveforms
- Cursors
- Zoom
- Autoset (resets display format to YT)
All reference waveforms displayed in XY format must have the same record length (500 or 10,000 points).
 Hard Copy
After you connect a printer and set up the oscilloscope, push the hard-copy button at the left of the display to make a hard copy. You can also store hard-copy images on a floppy disk and then transfer them later to a PC for printing or use in a report.
Setting Up to Print
Follow these steps to set up the oscilloscope to print a hard
copy:
1. Push the UTILITY menu button.
2. Push the System screen button to select Hard
Copy.
3. Push the Format screen button and then choose
the printer format appropriate for your application.
4. Push the Layout screen button and then select
the portrait or landscape page orientation.
5. Push the Ink Saver screen button and select On
for most applications. If you want the hard copy colors to be
the same as the screen colors, you can select Off (see
LINK).
6. Push the Port screen button and select the port
that your printer is connected to or select File to save
the hard copy on a floppy disk (see LINK)
for more information about using the floppy disk).
7. Push the hard copy button
Color and Gray-Scale Printing. You can print a color hard copy that uses the display colors. Gray-scale waveform information is printed as shades of color. If you have a DeskJet or LaserJet monochrome printer, gray-scale waveform information is printed as a dithered image.
Ink Saver and Preview. As an alternative to printing the display colors, turn on the Ink Saver function to print a hard copy with a white background. This function saves printer ink while it preserves the color coding of the waveforms and readouts.
Ink saver also works with the monochrome print formats.
Push and hold the Preview screen button to show how the colors will appear on the paper.
Clear Spool. You may want to push the Clear Spool screen
button to empty the print spooler in these situations:
- To stop a hard copy operation in progress
- If the hard copy port connection is not made due to incompatible
settings (such as baud rate)
- If you lose the hard copy port connection before the hard copy
is complete
Date and Time Stamp. To print the current date and time
on your hard copies, do these steps:
1. Push the UTILITY button.
2. Push the System screen button to select Config.
3. Push the Set Date & Time screen button.
4. Set the Display Date/Time to On to add
the current date and time to the display screen.
Horizontal Controls
Use the horizontal controls to adjust the time base, adjust the
trigger location, and to examine waveform details more closely.
 Horizontal Position
Control
Horizontal Position
Control
When delay is off, the horizontal POSITION control moves the trigger point within the acquired waveforms. You can select full pretrigger, full post trigger, or any point in between.
Use a pretrigger setting (trigger position near 100% of the record) to acquire waveforms leading up to a trigger event. For example, if you can trigger on an error condition, the waveforms leading up to the error condition might tell you why the error occurred.
Use a posttrigger setting (trigger position near 0% of the record) when you want to acquire waveforms that follow a trigger event. Use a mid-screen setting when you are interested in information both before and after the trigger event.

See Delay Button LINK and Zoom Button LINK for information about how the horizontal POSITION control operates when these functions are active.
When you adjust horizontal POSITION, a vertical line temporarily appears on the screen to show you the trigger position. After the line disappears, the trigger position is marked with the letter T at the top of the graticule and also in the waveform record icon at the top of the screen.
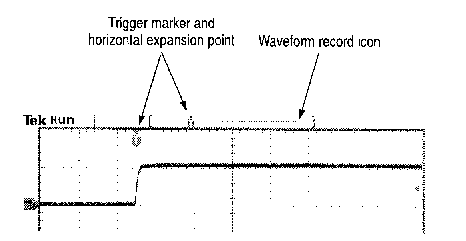
The small inverted triangle is the horizontal expansion point. When you change the horizontal SCALE setting, the waveforms contract or expand about this point. When delay is off, the horizontal expansion point is the same as the trigger point.
Push the DELAY button when you want to delay the acquisition relative to the trigger event. Turn the horizontal POSITION control counterclockwise to increase the delay; the trigger point moves to the left and ultimately outside of the acquired waveform. Then, you can adjust the horizontal SCALE to acquire more detail around the area of interest (center of the screen).
When delay is on, the trigger point separates from the horizontal expansion point. The horizontal expansion point stays at the center of the screen. The trigger point can move off the screen; when this happens, the trigger marker turns to point in the direction of the trigger Mint.
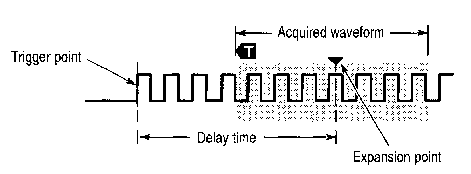
Use the delay feature when you want to acquire waveform detail that is separated from the trigger event by a significant interval of time. For example, you can trigger on a sync pulse that occurs once every 10ms and then look at high-speed signal characteristics that occur 6ms after the sync pulse.
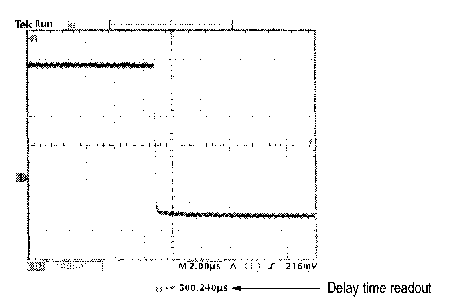
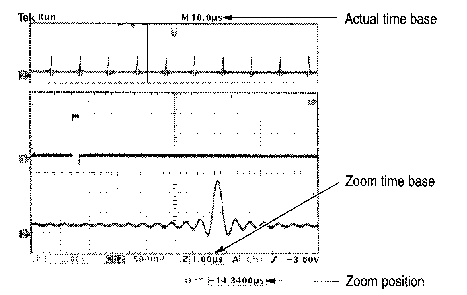
In the screen example below, the trigger markers show that the trigger point is before the acquired waveform. The delay time, shown in the readout, is the time from the trigger point to the expansion point (center screen).
The interaction between delay and other functions is summarized in the table below.
| Function | Delay off | Delay on |
| Trigger point | Any point within the acquired waveform | Can occur prior to the acquired waveform |
| Expansion point | Same as the trigger point | Always center screen |
| Horizontal SCALE | Sets time base | Sets time base |
| Horizontal POSITION | Sets trigger position in the acquired waveform | Sets delay time |
![]()
 Horizontal
Scale Control
Horizontal
Scale Control
Use the horizontal SCALE control to adjust the time base. When delay is off, the scale expands or contracts around the trigger point. When delay is on, the scale expands or contracts around the center of the screen (see Delay Interactions at LINK for possible exceptions).
When the zoom function is active, use the horizontal SCALE control to adjust the amount of horizontal magnification (the actual time-base setting remains unchanged). The magnified waveforms always expand or contract around the center of the screen.
Push the zoom button to magnify the current acquisition along the horizontal axis so you can see more detail. Use the horizontal SCALE control to adjust the amount of magnification. Use the horizontal POSITION control to select the portion of the waveform you want to magnify. When zoom is on, changes you make to these controls do not affect the actual time base or trigger position settings.
The split screen shows the entire selected waveform in the upper window to give you a point of reference as you examine the details in the lower window.
Key Points
Maximum Zoom Magnification Factor. If you are using Normal
acquisition resolution, the maximum horizontal magnification factor
is 200X; in Fast-trigger the maximum is 10X
Horizontal Zoom and Preview. There are two ways you can magnify a stopped acquisition, horizontal zoom or preview. The differences in how horizontal zoom and preview interact with other functions are shown below.
| Function | Horizontal zoom | Horizontal preview |
| Horizontal SCALE | Sets magnification factor | Changes time base for the next acquisition |
| Horizontal POSITION | Selects portion of waveform to magnify | Changes trigger position or delay time for the next acquisition |
| DELAY button | Turns delay on and off | Turns delay on and off |
| Math waveform | Remains valid; magnifies and positions with other waveforms | Remains fixed; does not track changes to channel waveforms |
| Cursors and automatic measurements | Remain functional with valid readouts | Remain locked to channel waveforms |
| Gray-scale | Gray-scale information may be temporarily reduced | Gray-scale information is lost |
Using Zoom and Delay Together. You can use both zoom and delay at the same time to magnify a delayed acquisition.
Fast Time-Base Settings. At the fastest time-base settings, only a portion of the waveform shows in the display. The waveform record icon indicates that portion with brackets. Push the zoom button and then use the horizontal POSITION control to scroll through the entire waveform to see any portion you want. The affected time-base settings are shown below.
| Acquisition resolution | Affected time-base settings |
| Normal | 100ns/div to 1ns/div |
| Fast Trigger | 4ns/div to 1ns/div |
At the fastest time-base settings, the maximum zoom magnification factor is also reduced.
Delay Interactions. The maximum delay setting is a function of the time-base setting and acquisition resolution. If you set a large positive or negative delay, that amount of delay might be automatically reduced if you make the following additional control changes:
- Change to a faster time-base setting
- Change from Fast Trigger to Normal acquisition resolution
If the delay reduction occurs, it may cause the waveform horizontal
position to shift.
Negative Delay. You can select up to ten divisions of negative delay. At the fastest time base settings, you can use negative delay to see more of the waveform that occurs before the trigger point.
Roll Mode Display. To obtain a rolling display similar to a strip-chart recorder, turn off zoom and delay, select the Auto trigger mode, and set the horizontal SCALE control to 40ms/div or slower. Subsequent changes to the horizontal SCALE cause the roll-mode display to erase and restart.
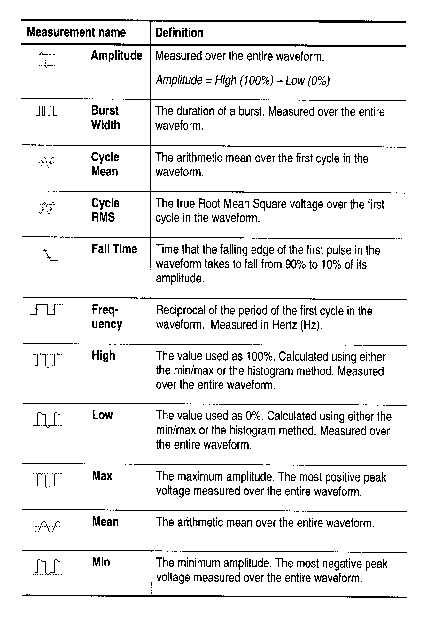
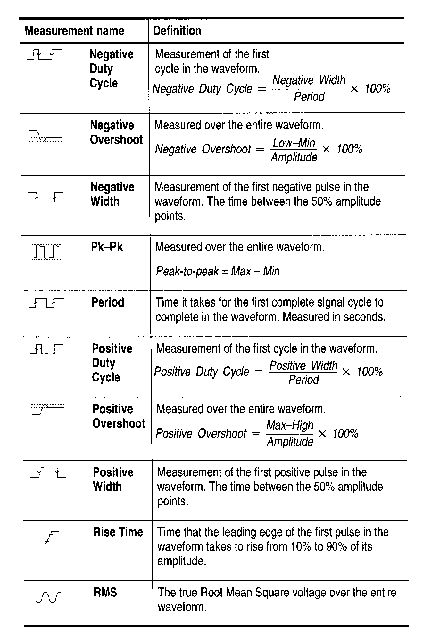
 Measure
Push the MEASURE button to show the measure menu.
| Bottom | Side | Description |
| Select Measurement | See table on page 3-31 for a description of the automatic measurements. | |
| Remove Measurement | Measurement 1 Measurement 2 Measurement 3 Measurement 4 | Removes a specific measurement. |
| All Measurements | Removes all measurements. | |
| Gating | Off | Use to take measurements on the full waveform record. |
| Screen | Use to take measurements on the portion of the waveform on screen. | |
| Cursors | Use to take measurements on the portion of the waveform between the V Bar cursors. | |
| Bring Selected Cursor to Center Screen | Moves the active cursor to center screen. | |
| Bring Both Cursors On Screen | Moves any off -screen cursor onto the screen. | |
| High-Low Setup | Auto Select | Automatically uses the best measurement method depending on the signal characteristics. |
| Histogram | Use to measure pulses. | |
| Min-Max | Use to measure other wave shapes. |
| Reference Levels | Set Levels in % or units | Use to choose custom reference levels in relative or absolute units. |
| High Reference | Sets custom high reference level. | |
| Mid Reference | Sets custom mid reference level. | |
| Low Reference | Sets custom low reference level. |
Key Points
Choosing Measurements. You can perform up to four automatic
measurements and display them along the right side of the graticule.
All four measurements can apply to a single channel or you can
spread the measurements over several channels. You can also take
measurements on math and reference waveforms.
First push a channel, MATH, or REF button to select the waveform you want to measure and then select a measurement. The table at LINK describes the measurements in detail.
Measurement Interaction with Preview. If you change a vertical or horizontal control setting while acquisition is stopped or is waiting for trigger, measurements track the changes and remain valid.
Taking Gray-Scale Measurements. Using cursors is often the best way to take simple measurements on waveforms that contain significant gray-scale information. The automatic measurements operate only on the latest acquisition, not on the previous acquisitions that are displayed in gray scale. However, you can set the cursors to surround
High-Low Setup. The oscilloscope determines the 10%, 50%, or 90% levels of the waveform and then uses them to calculate the measurements. You can choose the method used to determine these levels:
- Histogram sets the values statistically; it finds the most
common value either above or below the midpoint (depending on
whether it is defining the high or low reference level). Since
this statistical approach ignores short-term aberrations (overshoot,
ringing, noise), histogram is the best method for measuring digital
waveforms and pulses.
- Min-max uses the highest and lowest values of the waveform record.
This method is best for measuring waveforms that have no large,
flat portions at a common value, such as sine waves and triangle
waves.
- Auto Select chooses one of the above methods automatically depending
on the signal characteristics. Auto Select chooses the histogram
method if the histogram contains prominent peaks. If not, Auto
Select chooses the min-max method.
Measurement Gating. You can use the gating feature to limit measurements to the portion of the waveform that is on the screen or between the cursors.
When you turn Screen gating on, the oscilloscope only uses the waveform points on screen in its measurements. This function is useful at the fastest time base settings or when you want to take measurements on a magnified waveform (when zoom is on).
When you turn Cursor gating on, the oscilloscope displays vertical bar cursors. Use the general purpose knob and SELECT button to place the cursors around the area of interest.
In the example below, the cursors surround the second positive-going pulse so the oscilloscope can measure the width of that pulse.
When gating is off, the oscilloscope takes measurements over the entire waveform record.
Using Measurement Gating with Cursors. If V Bar cursors are already on when you select Cursor gating, the cursors do both functions at the same time. The cursor readouts are displayed at the same time that the cursors gate the automatic measurements.
If H Bar cursors are on when you select cursor gating, the H Bar cursors are turned off.
![]()

Push the QUICKMENU button to see a set of frequently used menu functions on the display. QuickMenus simplify oscilloscope operation and can increase your productivity.
Scope is a standard QuickMenu for general purpose oscilloscope use. Some optional application modules also include a custom QuickMenu display. See LINK for an example of the Scope QuickMenu.
Key Points
Using the QuickMenus. To use a QuickMenu, push the screen
button that corresponds to the control you need to set. Push the
screen button repeatedly to choose one of the settings. The small
arrow icon indicates that there are additional settings available
that are not shown.
You can use most of the front-panel controls at the same time you are using a QuickMenu. For example, if you push a channel button to select a different channel, the QuickMenu changes to show information about that channel.
Using Other Menus. You can still use the regular menus. For example, if you push the MEASURE button, you can set up and take automatic waveform measurements in the usual way. If you return to the QuickMenu, the measurement is still displayed on the screen.
Selecting Between QuickMenus. You may have optional application modules installed that also have QuickMenu displays. To select the QuickMenu you want to use, push the MENU screen button. This menu item is shown only if application modules that contain a QuickMenu are installed.
Save/Recall
Push the SAVE/RECALL button to show the save/recall menu.

| Bottom | Side | Description |
| Save Current Setup | To File | Saves a setup to disk. |
| To Setup 1 …. To Setup 10 |
Saves a setup to nonvolatile memory. | |
| Recall Saved Setup | From File | Recalls a setup from disk. |
| Recall Setup 1 ... Recall Setup 10 |
Recalls a setup from nonvolatile memory. | |
| Recall Factory Setup | OK Confirm Factory Init. | Initializes the setup. |
| Save Wfm | To File | Shows file-format choices: Internal, Spreadsheet, or Mathcad (see page 3-37 manual). Saves the selected waveform to disk. |
| To Ref1 ... To Ref4 |
Saves the selected waveform to nonvolatile memory. | |
| Recall Wfm | From File Recall Ref1 Recall Ref4 |
Recalls a waveform from disk and displays it as a reference waveform. |
Key Points
Saving to Disk. See Saved Waveform Formats LINK
for information about saving to and recalling from the disk.
Saving Setups. To save the current setup to nonvolatile memory, push the Save Current Setup screen button and then select one of the ten storage locations. Then, push the OK Overwrite Saved Setup screen button to complete the operation or the MENU OFF button to cancel the operation.
Recalling Setups. To recall a setup from nonvolatile memory, push the Recall Setup screen button and then select one of the ten storage locations.
Recalling the Factory Setup. Recall the factory setup to initialize the oscilloscope to a known setup. Appendix B (user manual) describes the Factory Setup in detail.
To recall the factory setup, push the Recall Factory Setup screen button. Then, push the OK Recall Factory Setup screen button to complete the operation.
Saving a Waveform. To save a waveform to nonvolatile memory, first select the waveform you want to save. Push the Save Wfm screen button and then select one of the four reference waveform locations. See LINK for an alternate method you can use to save waveforms.
Saved waveforms contain only the most current acquisition; gray-scale information, if any, is not saved.
Displaying a Reference Waveform. To display a waveform stored in nonvolatile memory, push the REF button and then push the Ref1, Ref2, Ref3, or Ref4 screen button.
When a reference waveform is selected, it appears brighter than other reference waveforms. Reference waveforms do not contain gray-scale information.
Removing a Reference Waveform from the Display. To remove
a reference waveform from the display, push the REF button and
then the Ref1, Ref2, Ref3, or Ref4 screen button to select a reference
waveform. Push the waveform off ![]() button. The reference waveform is still in nonvolatile memory
and can be displayed again.
button. The reference waveform is still in nonvolatile memory
and can be displayed again.
Using the Disk Drive
This section describes how to use the disk drive. The File Utilities
submenu is shown below.

| Bottom | Side | Description |
| File Utilities | Delete | Deletes a file. |
| Rename | Renames a file. | |
| Copy | Copies a file to another directory. | |
| Prints a file to a printer connected to one of the hard copy ports. | ||
| Create Directory | Creates a new directory. | |
| Confirm Delete | Turns On or Off a confirmation message before files are deleted. | |
| Overwrite Lock | Sets file overwrite protection to On or Off. | |
| Format | Formats a disk (erases all files). |
Key Points
Saved Waveform Formats.
Use the Internal waveform format to save a waveform to disk if
you intend to recall it to the display later as a reference waveform.
Use the Spreadsheet format to create a comma-separated data file
compatible with most spreadsheet programs. Use the Mathcad format
if you intend to import the waveform data into Mathcad software.
Navigating the File System. When you insert an IBM-formatted disk and push the File Utilities screen button, the oscilloscope shows a list of directories and files on the disk.
Use the general purpose knob to select a directory or file. To change the working directory, select the directory and then push the SELECT button. To move up one directory level, select .. and then push the SELECT button.
Automatic File Numbering. The oscilloscope gives all files created by the oscilloscope the default name TEK?????, where the question marks are place holders for an automatic number sequence from 00000 to 99999.
You can change the TEK????? file to a new name with up to eight characters. If you use fewer than eight characters and include trailing question marks, the oscilloscope numbers the files sequentially if more than one are saved with the same base name.
For example, if you rename the TEK?????.ISF file to TEST??.ISF for a series of saved waveforms, the oscilloscope saves the first one as TEST00.ISF, the second one as TEST01.ISF, up to the last one as TEST99.ISF.
Entering File or Directory Names. You can rename files and directories. Use the general purpose knob to select an alphanumeric character. Use the screen buttons described below to edit and enter the new name.
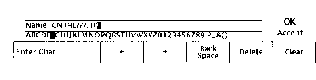
| Screen button | Function |
| Enter Char | Enters the selected character into the new name. |
| ¬ and ® | Moves the cursor to a different character in the name. |
| Back Space | Deletes the character before the cursor location. |
| Delete | Deletes the character at the cursor location. |
| Clear | Erases the current name. |
| OK Accept | Enters the new name. |
| MENU OFF | Exits the operation. Leaves existing names intact. |
Deleting Files. To delete a file, select the file with the general purpose knob, push the Delete screen button, and then push the OK Delete screen button when you see the confirmation screen.
If you do not want to see a confirmation screen each time you delete a file, push the Confirm Delete screen button to set it to Off.
Renaming Files. To rename a file, select the file with the general purpose knob, push the Rename screen button, and then follow the instructions above.
Once a directory is created, you cannot rename it. However, you can delete the directory and create a new one with a new name.
Copying Files and Directories. To copy a file or directory, select the file or directory with the general purpose knob and push the Copy screen button. Now use the general purpose knob and SELECT button to select a destination directory. Push the copy confirmation screen button to complete the operation.
Printing Files. You can print files through any installed printer port to your printer. This function is especially useful if you want to print hard copy files that you have stored on a disk.
To print a file, select the file with the general purpose knob. Push the Print screen button and then select the port that your printer is connected to.
Creating a Directory. To create a directory, use the general purpose knob and SELECT button to select the working directory where you want the new directory to reside. Push the Create Directory screen button and then follow the instructions above.
Formatting a Disk. The oscilloscope can format 1.44 MB IBM-compatible disks. To format a disk, insert it into the disk drive. Push the Format screen button and then push the OK Confirm Format screen button to confirm the operation. If you decide not to format the disk, push the MENU OFF button to stop the format operation.

CAUTION. To avoid loss of data, do not format disks that already contain important data. When You format a disk, all files and directories will be erased and can never be recovered.
Setting Protections. The oscilloscope provides two protections
to help you prevent accidental loss of data:
- Confirm Delete shows a confirmation message each time you try
to delete a file. You can turn Confirm Delete off if you do not
want to see the message.
- Overwrite Lock prevents the oscilloscope from writing over existing
files. You can turn Overwrite Lock off if you want to be able
to write over existing files.
File Extensions. Files written by the oscilloscope have the following extensions. The oscilloscope can only read files with the SET and ISF extensions.
| File extension | File type |
| *.SET | Saved setup file |
| *.ISF | Saved waveform file, Internal format |
| *.CSV | Saved waveform file, Spreadsheet format |
| *.DAT | Saved waveform file, Mathcad format |
| *.TJ | Hard copy file, ThinkJet format |
| *. DJ | Hard copy file, DeskJet format |
| *.LJ | Hard copy file, LaserJet format |
| *.IBM | Hard copy file, Epson format |
| *.IMG | Hard copy file, Interleaf format |
| *.TIF | Hard copy file, TIFF format |
| *.RLE | Hard copy file, RLE format |
| *.PCX | Hard copy file, PCX format |
| *.BMP | Hard copy file, BMP format |
| *.EPS | Hard copy file, EPS format |
![]()
 Trigger Controls
Push the trigger MENU button to show the trigger menu and then push the Type screen button to select Edge or Video. See links at LINK1 and LINK2 for descriptions of Edge and Video trigger.
See the manual for the TDS3TRG Advanced Trigger or TDS3VID Extended Video application module for more information if either module is installed.
 Trigger Level
Use the trigger LEVEL control to adjust the trigger level. When you change the trigger level, a horizontal line temporarily appears to show you the level on screen. After the line disappears, the trigger level is marked with a small arrow.

 Set to 50%
Push the SET TO 50% button to set the trigger level to the 50% amplitude level of the trigger source waveform.
 Force Trigger
Push the FORCE TRIG button to force an immediate trigger event, even in the absence of a signal. This function is useful in these situations:
- If you do not see a waveform on the screen when using Normal trigger mode, push FORCE TRIG to acquire the signal baseline to verify that it is on the screen.
- After you push the SINGLE SEQ button to set up for a single shot acquisition, you can push the FORCE TRIG button to do a practice acquisition to verify the control settings.
![]() B Trigger
B Trigger
To use the B trigger, the A trigger type must be Edge. Push the trigger MENU and B TRIG buttons to show the B-trigger menu and to activate triggering using both the A and B triggers.
| Bottom | Side | Description |
| B Trigger After A | Time | After the A trigger arms the trigger system, the oscilloscope triggers on the next B-trigger event that occurs after a period of time that you can set with the general purpose knob. |
| B Events | After the A trigger arms the trigger system, the oscilloscope triggers on the Nth B-trigger event. Set event number with the general purpose knob. | |
| Source Coupling Slope Level |
Sets Source, coupling, slope, and level for the B trigger. These settings are independent of similar settings for the A trigger, See LINK for descriptions of these menu items. |
The trigger wait time is the minimum time between the A and B triggers. The trigger wait time is not the same as the horizontal delay time. You can use the horizontal delay function to delay acquisition relative to any trigger event, whether it is from the A trigger alone or from a trigger setup that involves both the A and B triggers.
The following examples show wait-for-time and wait-for-events triggering and how they relate to the horizontal delay time.
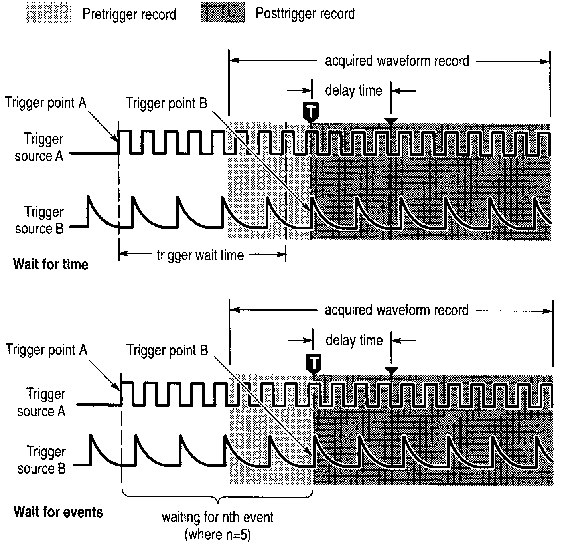
The light next to the B TRIG button indicates B trigger is active. Push the B TRIG button again to return to the single A trigger.
Trigger Status
Readout at the top of the screen shows you the current trigger
status. The table below explains the trigger status indicators.
| Trigger status | Explanation |
| Auto | The oscilloscope is acquiring using auto trigger. |
| Valid trigger events, if any, are infrequent. | |
| Trig'd | The oscilloscope is acquiring using valid trigger events that are frequent enough to avoid auto triggering. |
| PrTrig | The oscilloscope is acquiring the pretrigger part of the waveforms. This status is shown only at the slowest time/division settings. |
| Trig? | The oscilloscope has acquired the pretrigger part of the waveforms and is waiting for a valid trigger event. |
| BTrig? | The A trigger event has occurred. The oscilloscope is armed and waiting for a valid B trigger event. |
Edge Trigger
Use Edge triggering to trigger on the rising or failing edge of
the input signal at the trigger threshold.
![]()
| Bottom | Side | Description |
| Type Edge | ||
| Source | CH1 ... CH4 |
Sets the trigger source to a specific channel. |
| AC Line | Sets the trigger source to use the AC line signal (not available when operating with batteries). | |
| Ext | Selects the external trigger source in two-channel oscilloscopes. Ext/10 | |
| Ext/10 | Provides a larger trigger-level range at reduced sensitivity. | |
| Vert | Sets the trigger source to the lowest-numbered active channel in the display. | |
| Coupling | DC | Selects DC coupling. |
| HF Reject | Rejects frequencies above 30 kHz in the trigger signal. | |
| LF Reject | Rejects frequencies below 1 kHz in the trigger signal. | |
| Noise Reject | DC coupling with low sensitivity to reject noise in the trigger signal. | |
| Slope | (rising edge) | Triggers on the rising edge of a signal. |
| (falling edge) | Triggers on the falling edge of a signal. |
| Bottom | Side | Description |
| Level | Level | Use to set the trigger level with the general purpose knob. |
| Set to TTL | Sets the trigger level to +1.4 V for TTL logic. | |
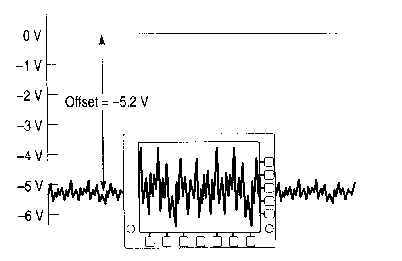
| Set to ECL | Sets the trigger level to -1.3 V for ECL logic Wee = -5.2 V). | |
| Set to 50% | Sets the trigger level to the 50% Amplitude level of the signal. | |
| Mode & Holdoff | Auto (untriggered roll) | Enables free-running and roll-mode acquisitions. |
| Normal | Triggers only on valid trigger events. | |
| Holdoff (time) | Sets holdoff to a specific time. | |
| Holdoff (% of record) | Sets holdoff to a percent of the record duration. | |
| Set to Min | Sets holdoff to the minimum value. |
Key Points
Displaying the Trigger Source. You do not have to display
a channel to use it as a trigger source.
Normal and Auto Mode. Use Normal trigger mode when you want to trigger only on a valid event. Use Auto trigger mode when you want the acquisition to occur, even when there is not a valid trigger event. Also choose Auto when you want a rolling waveform, with no trigger, at the slower time base settings. See LINK for more information about roll mode.
External Trigger. Two-channel oscilloscopes have an external trigger input. The trigger level range for the EXT setting is -0.8 V to +0.8 V. The trigger level range for the EXT/ 10 setting is -8 V to +8 V.
Four-channel oscilloscopes do not have an external trigger input; however, you can use any of the four channels as your trigger source.
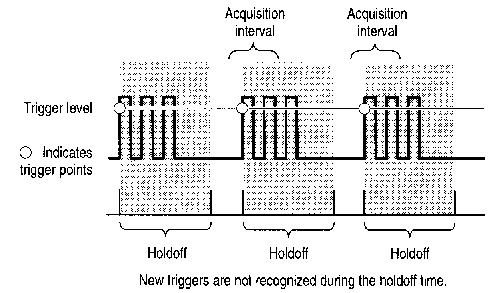
Holdoff. You can use holdoff to help stabilize the display of complex waveforms. After you press the Mode & Holdoff screen button, use the general purpose knob to set the holdoff time as an absolute value or as a percent of the record duration.
Holdoff begins when the oscilloscope recognizes a trigger event and disables the trigger system until acquisition is complete. The trigger system remains disabled during the holdoff time.
NOTE. For best results, choose Normal trigger mode when using long holdoff settings (10 ins or greater).
![]()
Video Trigger
Choose video triggering to trigger on the odd fields, even fields,
or on all the lines of an NTSC, PAL, or SECAM video signal. See
the manual for the TDS3VID Extended Video application module for
more information if that module is installed.

| Bottom | Side | Description |
| Type Video | ||
| Standard | 525/NTSC | Triggers on a NTSC signal. |
| 625/PAL | Triggers on a PAL signal. | |
| SECAM | Triggers on a SECAM signal. | |
| Source | See LINK for descriptions of these menu items. | |
| Trigger On | Odd Even |
Triggers on odd or even fields 'in an interlaced signal. |
| All Fields | Triggers on any field in an interlaced or noninterlaced signal. | |
| All Lines | Triggers on all lines. | |
| Mode & Holdoff | See LINK for descriptions of these menu items. |
Key Points
Displaying the Trigger Source. You do not have to display
a channel to use it as a trigger source.
Sync Pulses. When you choose Video, the trigger always occurs on negative-going sync pulses. If your video signal has positive-going sync pulses, invert the signal using the Vertical menu. See LINK for information about inverting a signal.
Vertical Controls
You can use the vertical controls to select waveforms, adjust
the waveform vertical position and scale, and set input parameters.
All vertical operations affect the selected waveform. Push a channel
button (CH1 or CH2), the MATH button, or the REF button to select
a waveform.
![]() Vertical Position
Control
Vertical Position
Control
Use the vertical POSITION control to locate the selected waveform in the display. When you change the vertical position, a horizontal line temporarily appears to show you the ground reference level on the screen. After the line disappears, the ground reference level is marked at the left of the graticule.
If acquisition is stopped you can still reposition waveforms for analysis. The new position setting is used when acquisition resumes.
 Waveform Off
Push the waveform OFF button to remove the selected waveform from the display. You can still use the channel as a trigger source.
 Vertical Scale Control
Use the vertical SCALE control to set the vertical scale factor of the selected waveform in 1-2-5 increments. If acquisition is stopped you can still rescale waveforms for analysis. The new scale setting is used when acquisition resumes.
You can also make fine adjustments to the vertical scale. See Channel Buttons below for more information.
![]() Vertical Menu
Vertical Menu
Push the vertical MENU button to show the vertical menu of
the selected waveform. See these pages for more information about
the specific vertical menus:
- Channel Buttons below
- Math Button at LINK
- Ref Button at LINK
![]() Channel Buttons
Channel Buttons
Push a channel button (CH1 or CH2) to select a channel. Each channel button also displays the channel if it is not already displayed. Push the vertical MENU button to show the vertical menu of the selected channel. All vertical operations below affect only the selected waveform.
| Bottom | Side | Description |
| Coupling | DC | Sets input coupling to DC. |
| AC | Sets input coupling to AC. | |
| GND | Provides a 0 V signal reference. The preamplifier disconnects from the input BNC. Input termination remains connected to the input BNC. | |
| W | Sets input resistance to 50 W or 1 MW , for DC or AC coupling. | |
| Invert | Invert Off | Use for normal operation. |
| Invert On | Inverts the polarity of the signal in the Preamplifier. |
| Bottom | Side | Description |
| Bandwidth | Full Bandwidth | Sets bandwidth to the full oscilloscope bandwidth. |
| 150 MHz | Sets the bandwidth to 150 MHz (not available on some models). | |
| 20 MHz | Sets the bandwidth to 20 MHz. | |
| Fine Scale | Fine Scale | Enables fine scale adjustment with the general-purpose knob. |
| Position | Vertical Position | Enables numerical vertical position adjustment. |
| Set to 0 divs | Sets vertical position to center screen. | |
| Offset | Vertical Offset | Enables vertical offset adjustment with the general-purpose knob. |
| Set to 0 V | Sets vertical offset to 0 V. | |
| Probe Setup |
Voltage Probe Current Probe |
Use to set probe gain or attenuation for probes that do not have the TekProbe II interface. |
| Deskew | Use to adjust the time skew correction for each probe. | |
| Set to 0 | Use to set probe skew correction to zero. |
Key Points
Using Probes with the TekProbe II Interface. When you attach
a probe with the TekProbe II interface, the oscilloscope sets
the channel sensitivity, coupling, and termination resistance
automatically to match the probe requirements.
Vertical Preview. When you change the vertical POSITION or SCALE controls while the acquisition is stopped or it is waiting for the next trigger, the oscilloscope re-scales and repositions the selected waveform in response to the new vertical control settings. You may see a clipped waveform if the original acquisition went off the screen. The oscilloscope then uses the new settings for the next acquisition.
In contrast to horizontal preview, the math waveform, cursors, and automatic measurements remain active and valid when using vertical preview.
The Difference Between Vertical Position and Offset. Vertical position is a display function. Adjust the vertical position to place the waveforms where you want to see them. The waveform baseline locations track adjustments made to their positions.
When you adjust vertical offset you see a similar effect, but it is actually quite different. Vertical offset is applied before the oscilloscope preamplifier and can be used to increase the effective dynamic range of the inputs. For example, you can use vertical offset to look at small variations in a large DC voltage. Set the vertical offset to match the nominal DC voltage and the signal appears in the center of the screen.
50W Protection. If you select the 50W termination resistance, the maximum vertical scale factor is limited to 1V/div. If you apply excessive input voltage, the oscilloscope automatically switches to 1MW termination resistance to protect the internal 50 W termination.
Push the MATH button to define the math waveform using the math menu. Also push the MATH button to display or select the math waveform. See the TDS3FFT FFT Application Module manual if you have that application module installed.
| Bottom | Side | Description |
| Dual Wfm Math | Set 1st Source to |
Selects the first source waveform. |
| Set Operator to |
Selects the math operator: +,-,*,o r ¸ |
|
| Set 2nd Source to | Selects the second source waveform. |
Key Points
Dual-Waveform Math. For the dual-waveform math operations,
the two source waveforms interact with the math operators in the
sequence shown below.
| Operation | Expression of math waveform |
| + | Source 1 + Source 2 |
| - | Source 1 - Source 2 |
| ´ | Source 1 ´ Source 2 |
| ¸ | Source 1 ¸ Source 2 |
Scaling and Positioning the Math Waveform To position or scale a math waveform, select the math waveform and then adjust it with a vertical POSITION or SCALE control. You can do this whether acquisition is running or is stopped.
Math Interaction with Preview. If you select a channel waveform and then adjust the vertical POSITION or SCALE control while the acquisition is stopped, the math waveform remains fixed. It does not track the changes you see to the channel waveform. The same is true if you adjust the horizontal POSITION or SCALE control under these conditions.
Gray-Scale Restriction. Math waveforms are always based on the most current acquisitions and do not contain any gray-scale information.
Push the REF button to show the reference menu. Push one of the sub menus to display a reference waveform or make it the selected reference waveform.
| Bottom | Side | Description |
| Ref1 | Save CH1 to Ref 1 | Saves channel 1 to Ref 1. |
| Save CH2 to Ref 1 | Saves channel 2 to Ref 1. | |
| Save Math to Ref1 | Saves the math waveform to Ref 1. | |
| Ref 2 Ref 3 Ref 4 |
Identical settings for
the reference waveforms Ref2, Ref3, and Ref4. |
|
Key Points
Selecting and Displaying Reference Waveforms. You can display
all four reference waveforms at the same time. Push the submenu
button to select a particular reference waveform. The selected
waveform appears brighter than other displayed reference waveforms.
Removing Reference Waveforms from the Display. To remove a reference waveform from the display, select that reference waveform and then push the waveform OFF button.
Scaling and Positioning a Reference Waveform. You can position and scale a reference waveform independently from all other displayed waveforms. Select the reference waveform and then adjust it with a vertical or horizontal POSITION or SCALE control. You can do this whether acquisition is running or is stopped.
If a reference waveform is selected, scaling and repositioning of the reference waveform operates the same way whether zoom is turned on or off.
Gray-Scale Restriction. Reference waveforms are always saved from the most current acquisition and do not contain any gray-scale information.
![]()